I know this look is ANYTHING BUT simple to some of you, but in my world, this is as easy and simple as it gets. You guys wouldn't believe it but, I don't wear ANY eyeshadow to school or work! If I do, most I'd do is a wash of champagnish colour on my lid OR a highlighter. That's why I every time I use colours, I go all out and go bold!
I had no idea what I was really going for when I started this tutorial. I just picked up random colours and in the end, I came up with a look that's almost the same as my OTHER blue-green look. GAHH!! WHERE HAS MY CREATIVITY GONE?!
Hopefully you guys will use different, more EXCITING colours than the ones I've used. I just did this to show the process and technique.

First thing you must do is start off with a clean, makeup-free eye.
Apply your favourite primer. I used and like Urban Decay Primer Potion.

Blend it out, all over your eyelid, upto your browbone.

Now, I want colours on my lid to stick, but I want the colour on my crease and high crease to be blended out and softened. Because UDPP is sticky (and blending is a b*tch on it), we'll pick up some powder with a big fluffy brush (Mac 224) and apply it in the crease, blending outwards. I usually use baby powder, but MUFE HD was nearby so I just used that. This will smoothen the area and colours will blend much nicer and softer.

Apply the powder and your highlight. Make sure it's satin or matte. We're using shimmery colours on the crease and want to balance out the look by using a matte highlight.

Next, I took a crease brush (Mac 226) and applied a matte blue eyeshadow (Ben Nye Cosmic Blue) in my crease, all around, focusing more on the outer half and not bringing it too close to my inner corner as I have close-set eyes. Another thing is, I almost always use a matte colour in my crease.
The reason is, matte darker colours, recede and make the crease appear deeper and darker. Shimmery colours reflect light and highlight. I usually only keep the shimmer on the lid, and use matte colours on the crease and up. Using shimmer on the lid and crease also doesn't look too good in pictures. All the shimmer will reflect light from the flash and it will just look like one big messy shimmerball.
Use a blending brush and blend it out. Start with a little bit of colour first, then keep going back and adding more colour and blending. It's easier to go darker, but not easy to go light from dark. So add a little bit of colour first then gradually build up to the intensity you want. I also patted some concealer all around my eyes and on the lid. This step is optional. At this time, you can also pat on some colour base if you want the eyeshadow to be brighter. I would have used dwelft paint pot from Mac but decided to skip it. Beacause it was ALL the way on the OTHER side of the room and and I was on my bed and was too lazy. So far, you should have something like this.

Next, I take my inner lid colour. I picked up Mac Gilded Green, but you can use any light shimmery green.

Apply the green on the inner half of your lid with a flat brush. PAT IT! We want the shimmer to stay and have the least amount of fallout as possible.

Next, I took Mac Teal Pigment with another flat brush. Tap the brush on the lid to get rid of the extra.

Pat it on the outer half of your lid.

You should now have something like this. But a little prettier because my camera sucks.


You can probably leave it like this and finish it off with some mascara and liner. But ...
I like to make things more dramatic. So I take my tiny detail brush and pick up some Mac Carbon. Make sure it's a matte black eyeshadow!
We then apply it in the crease, not going past the middle.

Take a blending crease brush (Mac 226) and blend out the black. You can go back and add more black, and blend it until you get it as dark as you want.

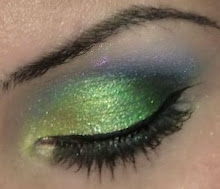
You should have something like this.

Now add some liner (Mac Blacktrack Fluidline), Mascara (YSl Faux Cils), and Falsies. And don't forget to take a small brush and run the colours on the bottom lashline too! Totally forgot that step. and VIOLA!


I hope this wasn't too confusing! And that it made sense and looks good because I'm at work as I type this lol in a 2 x 4 screen. I can't really see the whole thing. Sorry if this is too long and detailed!
Have a great day! <3